前言
太久没学习了,刚好最近有点想法,打码平台提供Python的SDK,不提供GO的,加上好久没写代码了,就用Python来恢复一下手感,顺便整理一下历史笔记,记录一下过程吧。
环境准备
- Python3
- Selenium: (
pip3 install selenium) - Chromedriver:最好选择和当前电脑中版本一致或相差不大的
基础测试代码
import time
from selenium import webdriver

driver = webdriver.Chrome(executable_path="./chromedriver")
driver.get('https://www.baidu.com/')
time.sleep(5)
driver.quit()
如果能打开百度,就说明一切正常。基础用法可参考:【2022 年】Python3 爬虫教程 - 经典动态渲染工具 Selenium 的使用
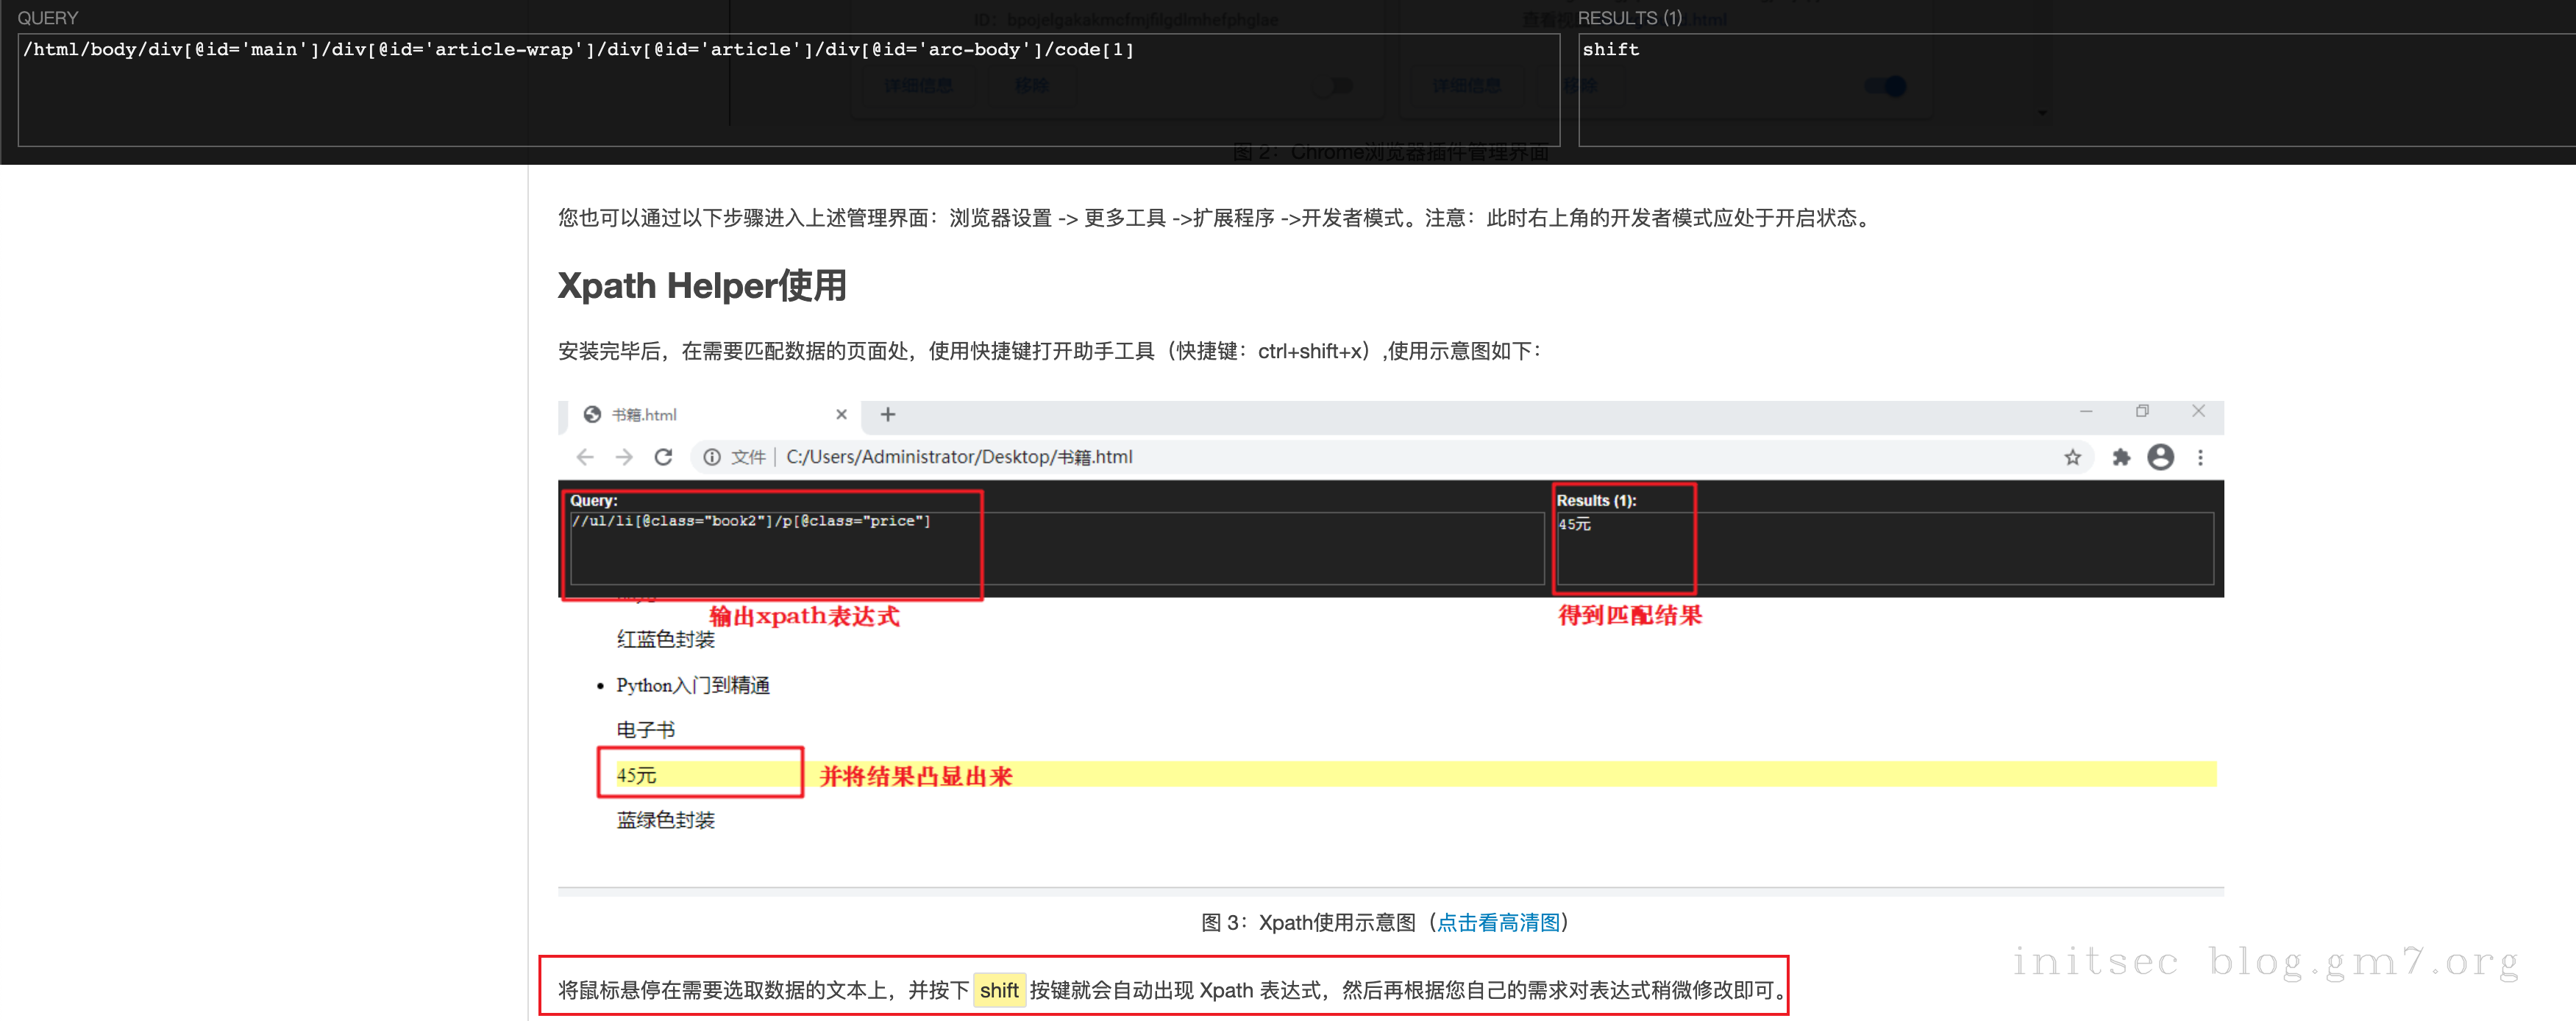
如果要使用Xpath去定位组件,可以用 chrome 应用商店提供的 Xpath Helper,用法如下
反爬绕过+拖动代码测试
各种高级点的验证码都需要点击或者拖动的,这里用滑块验证码举例,代码为拖动组件的代码。
import time
from selenium import webdriver
from selenium.webdriver import ActionChains
from selenium.webdriver.chrome.options import Options

chrome_options = Options()
# chrome_options.add_argument('--headless')  # 无界面模式
chrome_options.add_argument('--window-size=1920,1080')  # 设置框大小,避免无头模式识别不出按钮
chrome_options.add_argument('--disable-gpu')  # 禁用显卡
chrome_options.add_argument('--incognito')  # 隐私模式
chrome_options.add_argument("--user-agent={}".format("Mozilla/5.0 (Macintosh; Intel Mac OS X 10_15_7) AppleWebKit/537.36 (KHTML, like Gecko) Chrome/96.0.4664.110 Safari/537.11"))  # 替换UA
chrome_options.add_argument("--disable-blink-features=AutomationControlled") # 从 Chrome 88 开始,它的 V8 引擎升级了,加了这个参数,window.navigator.webdriver=false

# 不显示上方的 Chrome正在受到自动化测试软件的控制
chrome_options.add_experimental_option('useAutomationExtension', False)
chrome_options.add_experimental_option("excludeSwitches", ['enable-automation'])

driver = webdriver.Chrome(executable_path="./chromedriver", options=chrome_options)
driver.get('http://www.runoob.com/try/try.php?filename=jqueryui-api-droppable')
driver.switch_to.frame("iframeResult")

source = driver.find_element_by_id("draggable")
target = driver.find_element_by_id("droppable")
actions = ActionChains(driver)
# 从1个组件拖动到另一个组件
actions.drag_and_drop(source, target)
# 根据像素拖动
# actions.drag_and_drop_by_offset(source, 250, 0)
actions.perform()

time.sleep(30)
driver.quit()
实战京东验证码(失败)
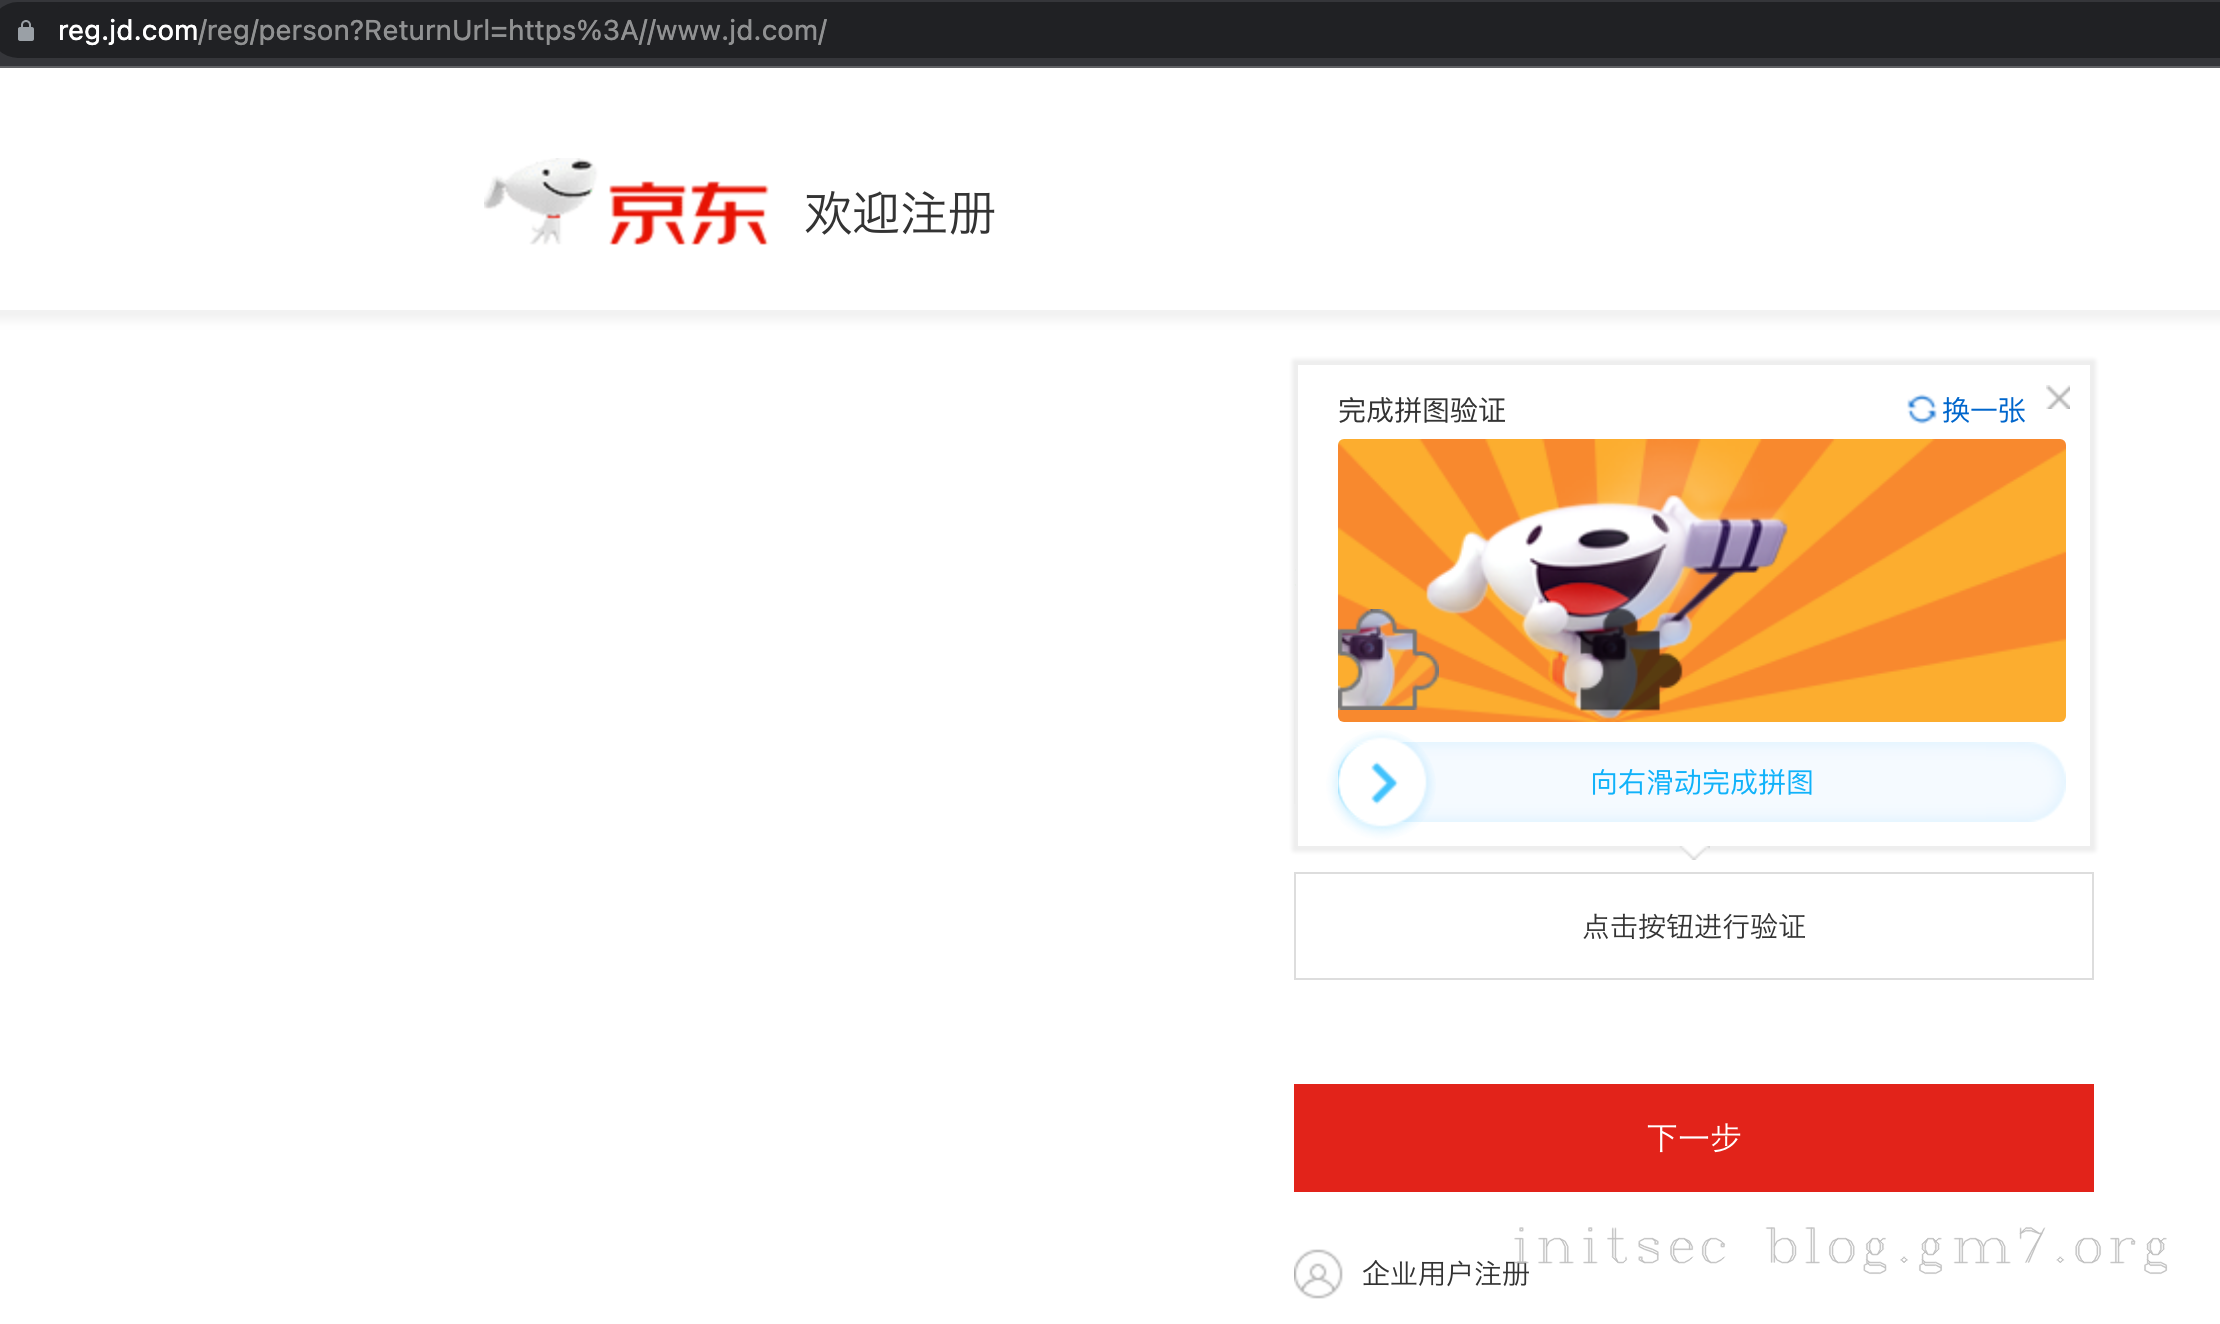
京东在注册处 https://reg.jd.com/reg/person?ReturnUrl=https%3A//www.jd.com/ 存在滑动验证码
直接用上方的代码,肯定是不行的,因为上方代码直接拖动一步到位,没有过程,一下就被识别出来是机器人了。于是尝试一点点的拖,稍微改良版如下:
ActionChains(wd).click_and_hold(source).perform()
for i in range(10):
    ActionChains(wd).move_by_offset(offset/10, 0).perform()
ActionChains(wd).pause(0.5).release().perform()
效果如下:

分析下失败原因,滑动验证码,大多数验证了鼠标轨迹,像上面那样就是如下的轨迹,明显机器人。(图自:https://www.rossidata.com/PythonAnimations)

实战京东验证码(成功)
后查阅资料,认识了一个新的名词 缓动函数,介绍如下:
缓动函数:自定义参数随时间变化的速率。现实生活中,物体并不是突然启动或者停止,当然也不可能一直保持匀速移动。就像我们打开抽屉的过程那样,刚开始拉的那一下动作很快,但是当抽屉被拉出来之后我们会不自觉的放慢动作。或是掉落在地板上的物体,一开始下降的速度很快,接着就会在地板上来回反弹直到停止。
参考代码:https://github.com/gdsmith/jquery.easing/blob/master/jquery.easing.js
缓动函数速查表:https://easings.net/zh-cn#
再抄点大佬代码中的get_tracks()函数,举例如下:其中返回的tracks列表就是每一次移动的位移长度。
import numpy as np


def ease_out_quad(x):
    return 1 - (1 - x) * (1 - x)


def ease_out_quart(x):
    return 1 - pow(1 - x, 4)


def ease_out_expo(x):
    if x == 1:
        return 1
    else:
        return 1 - pow(2, -10 * x)


def ease_out_bounce(x):
    n1 = 7.5625
    d1 = 2.75
    if x < 1 / d1:
        return n1 * x * x
    elif x < 2 / d1:
        x -= 1.5 / d1
        return n1 * x * x + 0.75
    elif x < 2.5 / d1:
        x -= 2.25 / d1
        return n1 * x * x + 0.9375
    else:
        x -= 2.625 / d1
        return n1 * x * x + 0.984375


def ease_in_out_bounce(x):
    return ( 1 - ease_out_bounce( 1 - 2 * x ) ) / 2 if x < 0.5 else ( 1 + ease_out_bounce( 2 * x - 1 ) ) / 2


def get_tracks(distance, seconds, ease_func):
    """
    可以根据滑块的偏移,需要的时间(相对时间,并不是准确时间),以及要采用的缓动函数生成拖动轨迹。

    :param distance: 位移距离
    :param seconds: 时间秒
    :par
    am ease_func: 调用的缓慢函数
    :return:
    """
    tracks = [0]
    offsets = [0]
    for t in np.arange(0.0, seconds, 0.1):
        ease = globals()[ease_func]
        offset = round(ease(t / seconds) * distance)
        tracks.append(offset - offsets[-1])
        offsets.append(offset)
    return offsets, tracks


a = get_tracks(100, 5, 'ease_in_out_bounce')
print(sum(a[1]))
print(a)

使用 ease_out_bounce 结果如下:
# 生成轨迹
_, tracks = test.get_tracks(offset, 1, 'ease_out_bounce')
# 缓慢拖动
ActionChains(wd).click_and_hold(source).perform()
for t in tracks:
    ActionChains(wd).move_by_offset(t, 0).perform()
ActionChains(wd).pause(0.2).release().perform()

对接打码平台坑点
使用平台:http://www.ttshitu.com 推荐码:478f4497b898415993e7dc9a3c4b7df8
前期,我直接用chromedriver截屏获取验证码图片,然后调用接口分析位移,但是一直不成功,验证码整体如下

该图片我本地用截图工具分析出需要水平位移的像素是129,实际传入程序使用起来也真是129

但是在多个打码平台测试后,发现识别出来都是272左右,人麻了

研究了一天,发现是因为自己电脑分辨率太高了
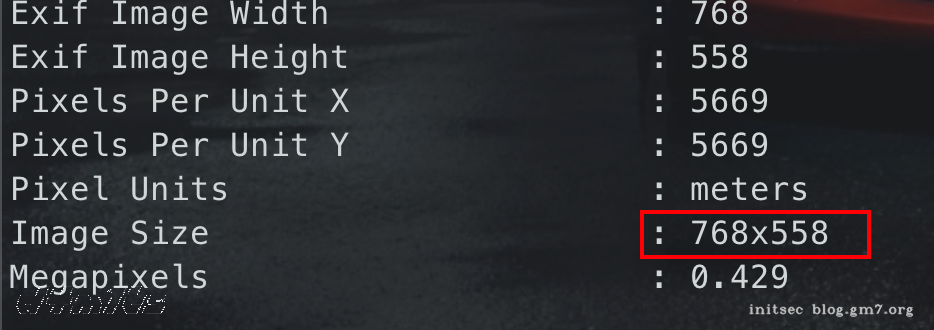
截图的大小用exiftool看应该是768x558,而我电脑用截图来看图片尺寸是383x276(接近2:1的关系),但打码平台分析图片是按照exiftool的大小结果来分析的,所以对应识别出来的位移也会大一些(差不多2倍的关系)
解决办法也比较简单,就是给识别出来的位移距离除以2,再手动适当调整就可以了;大体代码如下:
    # 截图整个屏幕
    wd.get_screenshot_as_file("1.png")
    # 切割验证码
    img = Image.open('1.png')
    region = img.crop((700 * 2, 180 * 2, 1080 * 2, 350 * 2))  ## 左上角坐标和右下角坐标
    region.save('2.png')  ## 将裁剪下来的图片保存到 举例.png

    # 调用第三方平台,来获取水平位移(存在一定误差,手动调整)
    offset = base64_api('2.png', 33)
    offset = int(offset) / 2 - 10
    print("识别出来需要水平位移", offset)
演示如下:
补充
判断某个标签是否加载
一般点了验证码不会马上出来,会有一点点延迟,结合判断的代码,可以避免代码运行出现异常
from selenium.webdriver.common.by import By
from selenium.webdriver.support.wait import WebDriverWait
from selenium.webdriver.support import expected_conditions as EC

WebDriverWait(wd, 5).until(EC.presence_of_element_located((By.NAME, "select-all")))  # 等待加载
WebDriverWait(wd, 5).until(EC.presence_of_element_located((By.XPATH,"/html[@class='root61']/body/div[@class='container w']/div[@class='main ']/div[@class='reg-form']/form[@id='register-form']/div[@id='step1-wrap']/div[@class='item-getcode-wrap']/div[@class='form-item form-item-getcode']/div[@class='slide-authCode-wraper']/div[@id='slideAuthCode']/div[@class='JDJRV-slide ']/div[@class='JDJRV-slide-bg ']/div[@class='JDJRV-slide-inner JDJRV-slide-btn']")))
加载插件
from selenium.webdriver.chrome.options import Options
chrome_options = Options()
# 加载插件
chrome_options.add_extension("./xpath.crx")
driver = webdriver.Chrome(executable_path="/usr/local/bin/chromedriver", options=chrome_options)
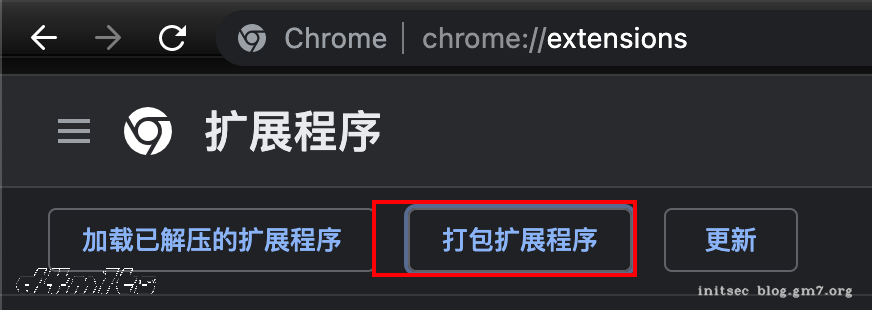
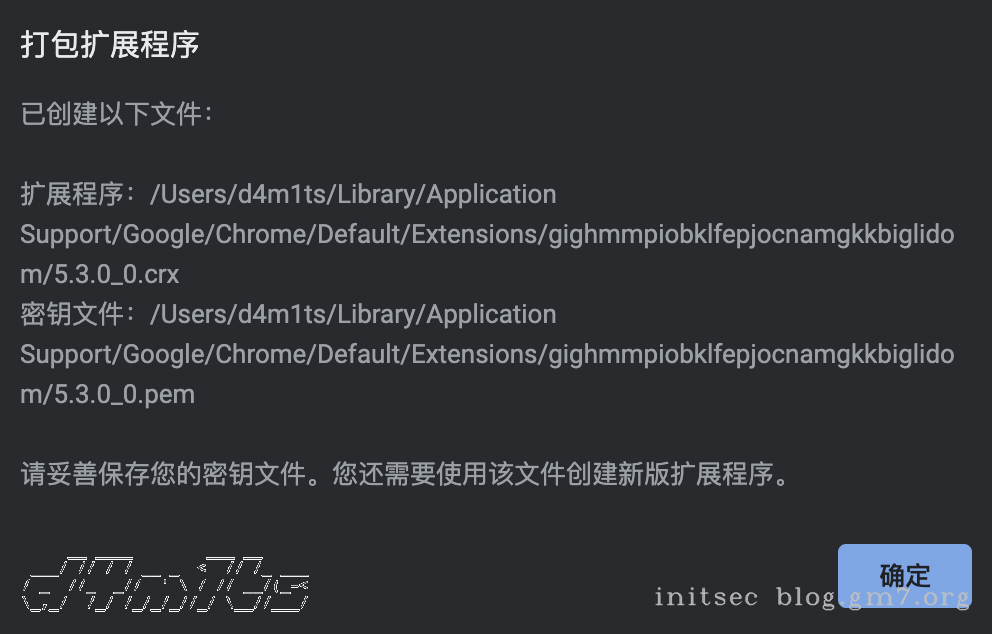
其中crx插件需要自己打包,打包方法如下:
通过chrome://version/找到插件保存的路径,插件就保存在个人资料路径下的Extensions目录中

然后在chrome://extensions/中找到你要打包的插件的ID

最后点击 打包扩展程序 进行打包即可